CSS 基础知识
HTML5 新特性?
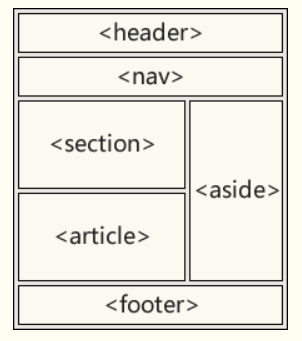
语义
新的语义元素
<h1>-<h6>表示 6 个不同级别的标题。<section>:表示包含在 html 文档中的独立部分,它没有更具体的语义元素来表示,一般来说有包含一个标题。<article>:意在成为可独立分配的或可复用的结构,如在发布中,可能是论坛帖子、杂志或新闻文章、博客、用户提交的评论,交互时组件,或者其他独立的内容项目。<nav>:表示页面的一部分,其目的是在当前文档活在其他文档中提供导航链接。导航部分的常见实例是菜单,目录和索引。<header>:用于展示介绍性内容,通常包含一组介绍性的或者是辅助导航的使用元素。它可能包含一些标题元素,但也可能包含其他元素,比如 Logo、搜索框、作者名称,等等。<footer>:表示最近一个章节内容或者根节点元素的页脚。一个页脚通常包含该章节作者、版权数据或者与文档相关的链接等信息。<aside>:表示一个和其余页面无关的部分,被认为是独立于该内容的一部分并且可以被单独拆分出来而不会使整体收到影响。<hgroup>:代表一个段的标题。它规定了在文档轮廓里的单一标题是它所属的隐式或显示部分的标题。
使用 HTML5 的音频和视频
<audio>
<audio
  src="AudioTest.ogg"
  autoplay>
  Your browser does not support the <code> audio</code> element.
</audio>
<video>
<!-- Simple video example -->
<video src="videofile.ogg" autoplay poster="posterimage.jpg">
  抱歉,您的浏览器不支持内嵌视频,不过不用担心,你可以 <a href="videofile.ogg">下载</a>
  并用你喜欢的播放器观看!
</video>

<!-- Video with subtitles -->
<video src="foo.ogg">
  <track kind="subtitles" src="foo.en.vtt" srclang="en" label="English">
  <track kind="subtitles" src="foo.sv.vtt" srclang="sv" label="Svenska">
</video>
表单的改进
html5 修改一些新的 input 输入特性,改善更好的输入控制和验证。
| 输入类型 | 描述 |
|---|---|
| color | 主要用于选取颜色 |
| date | 选取日期 |
| datetime | 选取日期(UTC 时间) |
| datetime-local | 选取日期(无时区) |
| month | 选择一个月份 |
| week | 选择周和年 |
| time | 选择一个时间 |
| 包含 e-mail 地址的输入域 | |
| number | 数值的输入域 |
| url | url 地址的输入域 |
| tel | 定义输入电话号码和字段 |
| search | 用于搜索域 |
| range | 一个范围内数字值的输入域 |
html5 新增了 5 个表单元素
| 名称 | 描述 |
|---|---|
<datalist> | 用户会在他们输入数据时看到域定义选项的下拉列表 |
<progress> | 进度条,展示连接/下载进度 |
<keygen> | 提供一种验证用户的可靠方法,生成一个公钥和私钥 |
<output> | 用于不同类型的输出 |
html5 新增表单属性
| 属性 | 描述 |
|---|---|
| placehoder | 输入框默认提示文字 |
| required | 要求输入的内容是否可为空 |
| pattern | 描述一个正则表达式验证输入的值 |
| min/max | 设置元素最小/最大值 |
| step | 为输入域规定合法的数字间隔 |
| height/wdith | 用于image类型 <input> 标签图像高度/宽度 |
| autofocus | 规定在页面加载时,域自动获得焦点 |
| multiple | 规定 <input> 元素中可选择多个值 |
连通性
Web Sockets
WebSocket协议为web应用程序客户端和服务端之间提供了一种全双工通信机制。
特点:
- 握手阶段采用 HTTP 协议,默认端口是80和443
- 建立在 TCP 协议基础之上,和 http 协议同属于应用层
- 可以发送文本,也可以发送二进制数据。
- 没有同源限制,客户端可以与任意服务器通信。
- 协议标识符是 ws(如果加密,为 wss),如
ws://localhost:8023
离线 & 存储
- Session Storage:是个全局对象,它维护者在页面会话期间内有效的存储空间。只要浏览器开着,页面会话周期就会一致持续。当页面重新载入(reload)或者恢复时(restore)时,页面会话也是一直存在着的。每在新标签或者新窗口中打开一个新页面,都会初始化一个新的会话。
- LocalStorage
- IndexedDB:是一种底层 API,用于在客户端存储大量的结构化数据。
2D/3D 绘图 & 效果
<canvas>是一个可以使用脚本来绘制图形的 HTML 元素。- SVG:是一种用于描述二维的矢量图形,基于 XML 的标记语言。
- WebGL(Web 图形库)是一个 JavaScript API,可在任何兼容的 Web 浏览器中渲染高性能的交互式 3D 和 2D 图形,而无需使用插件。
性能 & 集成
- Web Workers:能够把 JavaScript 计算委托给后台线程,通过允许这些活动以防止使交互事件变得缓慢。
- XMLHttpRequest(XHR)对象用于与服务器交互。通过 XMLHttpRequest 可以在不刷新页面的情况下请求特定 URL,获取数据。这允许网页在不影响用户操作的情况下,更新页面的局部内容。
- 拖放
设备访问 Device Access
- 使用 Camera API
- 触控事件
- 使用地理位置定位
- 检测设备方向
- 指针锁定 API
CSS3:见下方内容
CSS3 新特性?
- 阴影:
box-shadow,还可以设置多背景; - 使用图像来格式化边框的
border-image,圆角边框border-radius; CSS Transitions可以在不同状态间设置动画;- 排版:可以控制
text-overflow和hyphenation,还可以给它设置一个阴影或者更精确地控制它的decorations; - 布局
- flex 布局
- 多列布局
以下是多列布局的设置方式:
#col {
  column-count: 2
}
#wid {
column-width: 100px;
}居中对齐有哪些实现方式?
居中问题几乎必考,很重要,但很基础。
https://www.cnblogs.com/shiyou00/p/10695760.html
- 水平居中
text-align: center  /* inline 元素*/
margin: auto;  /* block 元素*/
left: 50%; margin-left: 负值 /* absolute 元素*/- 垂直居中
line-height 的值等于 height 的值
top: 50%; margin-top 为负值,需要知道子元素的宽度和高度
transform: (-50%, -50%);
top, left, bottom, right 的值都为 0 + margin: auto;
三个 div 分别靠左靠右居中?(float,flex,grid)
/* float */
float: left;
float: right;
/* 居中 */
<html>
    <body style="text-align:center">
        <div style="display:inline-block; *display:inline; zoom:1;">
          <div style="float:left">123243</div>
        </div>
    </body>
</html>
/* flex */
/* left/right/middle 主轴*/
justify-content: flex-start | flex-end | center
/* up/down/middle 交叉轴*/
align-items: flex-start | flex-end | center/* grid */
.container {
justify-items: start | end | center | strech;
align-items: start | end | center | strech;
}CSS 优先级
继承性
- 规则 1:最近的祖先样式比其他祖先样式优先级高
- 规则 2:「直接样式」比「祖先」样式优先级高
选择器的优先级
- 规则 3:内联样式 > ID 选择器 > 类选择器 = 属性选择器 = 伪类选择器 > 标签选择器 = 伪元素选择器
- 规则 4:计算选择符中 ID 选择器的个数(a),计算选择符中类选择器、属性选择器以及伪类选择器的个数之和(b),计算选择符中标签选择器和伪元素选择器的个数之和(c)。按 a、b、c 的顺序依次比较大小,大的则优先级高,相等则比较下一个。若最后两个的选择符中 a、b、c 都相等,则按照「就近原则」来判断。
- 规则 5:属性后插有
!important的属性拥有最高优先级。若同时插有 !important,则再利用规则 3、4 判断优先级。
CSS 布局?
flex 布局
flex 是 Flexible Box 的缩写,意为“弹性布局”, 用来为盒状模型提供最大的灵活性。
常见考题:
- flex 如何实现居中布局? --
justify content: center;,align-items: center;
grid 布局
圣杯布局和双飞翼布局
回答要点:
- 使用 float 布局
- 两侧使用 margin 负值,以便和中间内容横向重叠
- 防止中间内容被两侧覆盖,一个用 padding, 一个用 margin
手写圣杯布局:
<div id="header"> this is header</div>
<div id="container">
  <div id="center" class="column"> this is center</div>
  <div id="left" class="column"> this is left</div>
  <div id="right" class="column"> this is right</div>
</div>
<div id="footer"> this is footer</div>
body {
min-width: 550px;
}
#header {
text-align: center;
background-color: #f1f1f1;
}
#container { /* 容器设置两边 left 和 right 的宽度 */
padding-left: 200px;
padding-right: 150px;
}
#container .column {
float: left; /* 使用 float 布局*/
}
#center {
background-color: #ccc;
width: 100%;
}
#left {
position: relative; /* right 会相对自身移动,不会影响任何元素 */
background-color: yellow;
width: 200px;
/* left 是浮动的,左移最近块元素的 100% */
margin-left: -100%;
right: 200px; /* 自身宽度是 200,相当于左移 200px */
}
#right {
background-color: red;
width: 150px;
margin-right: -150px; /* right 元素的宽度被挤掉了变成 0,就上去了 */
}
#footer {
clear: both; /* footer 向下移动清除左右浮动 */
text-align: center;
background-color: #f1f1f1;
}双飞翼布局:
<div id="main" class="col">
  <div id="main-wrap">
    this is main
  </div>
</div>
  <div id="left" class="col">
    this is left
  </div>
  <div id="right" class="col">
    this is right
  </div>
body {
min-width: 550px;
}
.col {
float: left; /* 首先让 left 和 right 都在左侧浮动 */
}
#main-wrap {
margin: 0 190px 0 190px; /* 左右使用 margin 留白 */
}
#main {
width: 100%;
height: 200px;
background-color: #ccc;
}
#left {
width: 190px;
height: 200px;
background-color: #0000FF;
margin-left: -100%; /* 与圣杯布局一样 */
}
#right {
width: 190px;
height: 200px;
background-color: #FF0000;
margin-left: -190px; /* 往左拖动 190px,这里是 margin-left */
}手写 clearfix
如果一个元素里只有浮动元素,那它的高度会是 0。如果你想要它自适应地包含所有浮动元素,那你需要清除它的子元素。一种方法叫做 clearfix,即 clear 一个不浮动的 ::after 伪元素。
.clearfix: after {
  content: '';  /* 内容 */
  display: table;
  clear: both;
}
.clearfix {
  *zoom: 1; /* 兼容 ie 版本*/
}
京东面试题:如何实现两列布局,左边自适应,右边固定?
<div id="flex-container">
  <div class="box-left">box1</div>
  <div class="box-right">box2</div>
</div>
#flex-container {
display: flex; /* 采用 flex 布局 */
flex-direction: row; /* 按行排列 */
}
.box-left {
background: red;
flex: 1; /* 该值表示 flex 增长系数*/
}
.box-right {
background: blue;
width: 400px; /* width 设置为固定值 */
}如何理解盒模型?
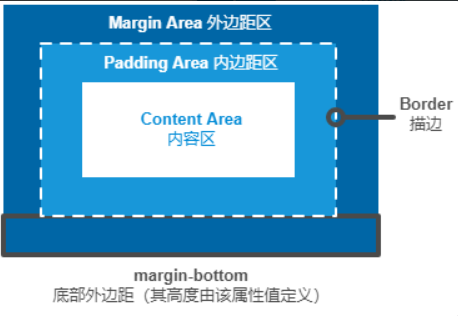
标准盒模型中,width 设置的是 content 的宽度;替代盒模型 中,内容宽度是宽度减去边框和填充部分。
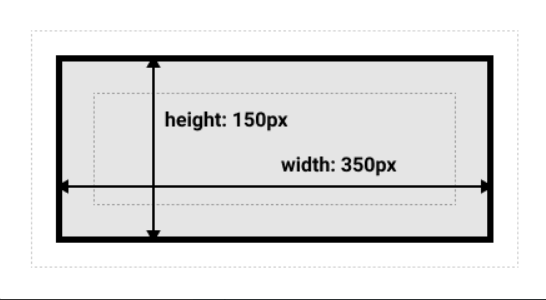
盒模型的计算题:
offsetWidth = (内容宽度+内边距+边框),无外边距
<!-- 如下代码,请问 div1 的 offsetWidth 是多大? 122px -->
<style>
	#div1 {
		width: 100px;
		padding: 10px;
		border:1px solid #ccc;
		margin: 10px;
		/* box-sizing: border-box; /* 转化为替代盒模型 */
}
</style>
<div id="div1">
</div>
如何理解 BFC?
BFC (Block Format Context,块级格式化上下文)是一块独立的渲染区域,内部元素的渲染不会影响边界以外的元素。
触发条件:
- float 值非 None
- position 的值为 absolute,fixed
- overflow 的值非 visible,如 overflow,hidden 均可触发;
- display 值为 flex、inline-block,table-cell,table-caption,inline-flex
特性:
- 属于同一个 BFC 的两个相邻容器的上下 margin 会重叠
- 计算 BFC 高度时浮动元素也参与计算
- BFC 的区域不会与浮动容器发生重叠
应用:清除浮动。
定位:position 都有哪些值?absolute 和 relative 的区别是什么?
- absolute:绝对定位,依据最近一层的定位元素定位,脱离了文档流;子绝父相,滚动的话也会跟着滚动;
- relative:相对定位,依据自身定位,未脱离文档流;
- static:默认值,使用正常的布局行为;
- fixed:移出文档流,依据在视口中的位置进行定位;比如广告,它是固定视口。
- sticky:粘性定位,想要生效,设置 top,left,right,bottom 的任意一个属性的值即可。
画图问题
京东:如何画一个圆和三角形?
可以通过下面的图来理解:
- 画圆就是通过设置圆角半径,使之等于盒模型边长的一半,所以看以来会是一个圆;
- 画三角形就是将 content 区域的宽和高都设置为 0,你看到的三角形其实是 border 的一条边。
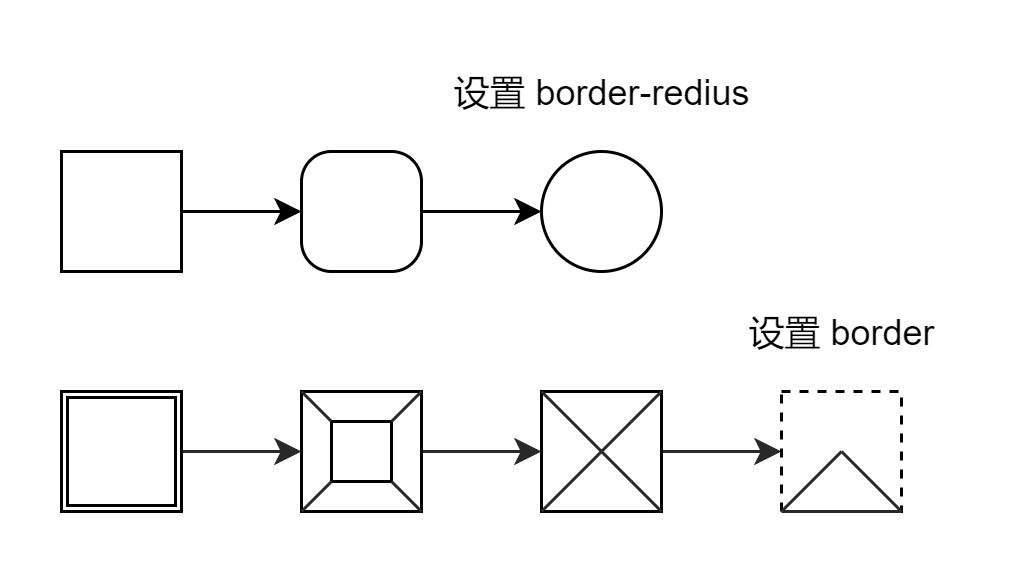
代码如下:
#circle {
  width: 200px;
  height: 200px;
  background: blue;
  border-radius: 100px;
}

#triangle { /* 底边设置成两边的两倍 */
  width: 0;
  height: 0;
  border-bottom: 200px solid pink;
  border-left: 100px solid transparent;
  border-right: 100px solid transparent;
}
🎲如何使用 flex 布局画三点的骰子?
常用语法回顾:
- flex-direction
- justify-content: space-between; 两端对齐;
- align-items
- flex-wrap
- align-self: center 第二个元素居中对齐
<div class="box">
  <span class="item"></span>
  <span class="item"></span>
  <span class="item"></span>
</div>
.box {
width: 200px;
height: 200px;
border: 2px solid #ccc;
border-radius: 10px;
padding: 20px;
display: flex;
justify-content: space-between;/* 两端对齐 */
}
.item {
display: block;
width: 40px;
height: 40px;
border-radius: 50%;
background-color: #666;
}
.item:nth-child(2) {
align-self: center; /*垂直方向居中*/
}
.item:nth-child(3) {
align-self: flex-end; /*垂直方向尾对齐*/
}line-height 如何继承?
✔ 如果当前元素本身设置了 line-height 的值:
- 写具体数值,如 30px,则继承该值(比较好理解)
- 写比例,如 2/1.5,则继承该比例(比较好理解)
- 写百分比,如 200%,则继承计算出来的值(考点)
✔ 如果当前元素本身未设置 line-height 的值
- 距离当前最近的祖先元素 p 设置了 line-height 为固定值,如 22px,则当前元素 E 的 line-height 值为 22px;
- 距离当前最近的祖先元素 P 设置了 line-height 值为百分比,如 120%,则当前元素 E 的 line-height 值为 120% * 祖先元素 P 的 font-size;
- 距离当前最近的祖先元素 P 设置了 line-height 为缩放因子,如 1.4,则当前元素 E 的 line-height 值为 1.4 * 当前元素 E 的 font-size.
rem 是什么?
- px,绝对长度单位,最常用
- em,相对长度单位,相对父元素,不常用
- rem,相对长度单位,相对 根 元素,常用于响应式布局
响应式布局的常见方案?
- media-query,根据不同的屏幕宽度设置根元素 font-size
- rem,基于根元素的相对单位
谈谈 vw/vh ?
- rem 的弊端:“阶梯”性
- 网页视口尺寸
- window.screen.height // 屏幕高度
- window.innerHeight // 网页视口高度
- document.body.clientHeight // body 高度
- vw / vh
- vh 网页视口高度的 1/100;
- vw 网页视口高度的 1/100;
- vmax 取两者最大值;vmin 取两者最小值
JS 基础
ES6 有哪些新特性?
主要以下几部分,每个部分都值得细细研究一下😁
注意:需要着重注意以下 forEach,map 等枚举函数的使用。
- let, const
- promise
- class
- set, map
- async await
- 箭头函数
- symbol
var,let,const 的区别?
- var 声明的变量存在变量提升,而 let 和 const 不存在变量提升
- let 和 const 声明形成块作用域,要先定义后使用
- 同一作用域下 let 和 const 不能声明同名变量,而 var 可以
- 通过 let/const 声明的变量直到它们的定义被执行时才初始化。在变量初始化前访问该变量会导致
ReferenceError。该变量处在一个自块顶部到初始化处理的“暂存死区”中。
function do_something(){
	console.log(bar); // undefined
	console.log(foo); // ReferenceError
	var bar = 1;
	let foo = 2;
}- const 一旦声明必须赋值,不能使用 null 占位;声明后不能再修改;如果声明的是复合类型数据,可以修改其属性。
- var 声明的变量会作为 window 的一个属性,而 let 和 const 声明的变量不会。
JS 有几种数据类型?
最新的 ECMAScript 标准定义了 8 种数据类型:
- 7 种原始类型:
- Boolean
- Null
- Undefined
- Number
- BigInt
- String
- Symbol
- 和 Object
typeof 能判断哪些类型
- 识别所有值类型
- 识别函数 function
- 识别引用类型 object
聊聊原型和原型链?
原型对象是在创建普通函数或构造函数时,解析器都会向函数中添加一个属性 prototype,它指向了一个对象,叫原型对象。当我们使用构造函数实例化多个对象时,原型对象相当于一块公共的区域,实例化的对象可以具有隐含的 __proto__ 属性,指向了原型对象的内存地址,进而可以访问到原型对象。
而原型对象也是一个对象,它同样具有属性 prototype 指向原型对象的原型对象,当构造函数中不存在实例化对象的某个属性时,会从它的原型对象中寻找该属性,如果没有该属性,则会中在原型对象中的原型中寻找,这样就形成了一个原型链,直到找到该属性,或者值位 null。
需要注意几个小细节:
Array instanceof Function // true
Object instanceof Function // true
Function instanceof Function // true
Function instanceof Object // true
// 前 3 个因为 Array,Function,Object 都是构造函数,他们的原型都是
// Function.prototype,而所有的对象最终都指向 Object,所以第 4 个成立,如有问题欢迎讨论
箭头函数和普通函数的区别?
1. 箭头函数是匿名函数,不能作为构造函数,不能使用 new
let a = () => {
  console.log(111)
}
a();

let fn = new a()
VM325:1 Uncaught TypeError: a is not a constructor
    at <anonymous>:1:10
2. 箭头函数不绑定 arguments,取而代之用 rest 参数解决
function A(a) { console.log(arguments) }
A(2, 'zzm', 'mzm')
Arguments(3) [2, 'zzm', 'mzm', callee: f, Symbol(Symbol.iterator):f]

let B = (b) => {
  console.log(arguments);
}
B(2, 92, 32, 32); // Uncaught ReferenceError: arguments is not defined
3. this 的作用域不同, 箭头函数不绑定 this,会捕获其所在的上下文的 this 值,作为自己的 this 值
var obj = {
  a: 10,
  b: () => {
    console.log(this.a); // undefined
    console.log(this); // window {postMessage: f, blur: f, close: f, frames: Window,...}
  },
  c: function() {
    console.log(this.a); // 10
    console.log(this); // {a: 10, f: f, c: f}
  }
}
obj.b()
obj.c()
4. 箭头函数没有原型属性
var a = () => {
  return 1;
}

function b() {
  return 2;
}

console.log(a.prototype); // undefined
console.log(b.prototype); // { consttructor: f }
5. 箭头函数不能当做 Generator 函数,不能使用 yield 关键字
数组方法,迭代方法:forEach,map
forEach()
forEach() 方法对数组的每个元素执行一次给定的函数。除了抛出一场以外,没有办法中止或跳出 forEach() 循环。如果你需要中止或跳出循环,forEach() 方法不是应当使用的工具。
const array1 = ['a', 'b', 'c'];
array1.forEach(element => console.log(element));
// "a"
// "b"
// "c"
判断一个对象是否是数组,有几种判断方法?
可以总结为以下 5 种:
let arr = []
arr instanceof Array // 1. 使用 instanceof
arr.__proto__ === Array.prototype // 2. 使用 __proto__
arr.constructor === Array  // 3. 使用 constructor ,以上三种主要是通过原型来判断的
Object.prototype.toString.call(arr) === '[object Array]'  // 4. 通过 object 类型的副属性 class 来判断,其中 函数的 class 是 Function
Array.isArray(arr) // es6 新增语法
何时使用 ===,何时使用 ==?
除了 == null 之外,其他一律使用 ===。下面是一些场景:
100 == '100' // true
0 == '' // true
0 == false // true
false == '' // true
null == undefined // true
// 除了 == null 之外,其他一律用 ===,例如
const obj = {x: 100}
if (obj.a == null) {
  // 相当于
  // if (obj.a === null || obj.a === undefined) {}
}
值类型和引用类型的区别?
- 存储位置不同:值类型存储在 栈 内存中,引用类型存储在 堆 内存中;
- 值类型变量的直接赋值是深拷贝,在栈内存中新开辟一块空间来存储值;引用类型的赋值是浅拷贝,只传递引用;
- 比较时,值类型是值的比较,而引用类型是地址的比较。对于引用类型来讲,即使他们的值相同,如果在内存中的地址不同,这两个对象仍然是不相等的。
js 继承有哪些方式?
- 基于原型链的继承
- 使用
class, extends, constructor, static和super关键字,只是语法糖,本质还是基于原型。
js 错误捕获机制
throw:手动中断程序执行,抛出一个错误try...catch:对错误进行处理,选择是否往下执行。只有错误可预知时才用,不可预知错误时使用都是不负责任的写法finally:不管是否出现错误,都必须运行最后的语句
手撕 js 代码
手写深拷贝
function deepClone(obj = {}) {
  if (typeof obj !== 'object' || obj == null) {
    // obj 是 null 或者不是对象和数组,直接返回
    return obj;
  }

  let res;
  if (obj instanceof Array) {
    res = [];
  } else {
    res = {};
  }

  for (let key in obj) {
    // 判断自身中是否包含指定属性
    if (obj.hasOwnProperty(key)) {
      res[key] = deepClone(obj[key]);
    }
  }
  return res;
}
手写 bind 方法
bind 方法的作用是什么?按照官方的说法:
bind()方法创建一个新的函数,在 bind() 被调用时,这个新函数的 this 被指定为 bind() 的第一个参数,而其余参数将作为新函数的参数,供调用时使用。
const module = {
  x: 42,
  getX: function() {
    return this.x;
  }
};

const unboundGetX = module.getX;
console.log(unboundGetX()); // The function gets invoked at the global scope
// expected output: undefined

const boundGetX = unboundGetX.bind(module);
console.log(boundGetX());
// expected output: 42
手写 bind js 代码如下:
// 模拟 bind
Function.prototype.bind1 = function() {
  // 将参数拆解为数组
  const args = Array.prototype.slice.call(arguments) // 变成数组

  // 获取 this(数组第一项)
  const t = args.shift()

  // fn1.bind(...) 中的 fn1
  const self = this

  // 返回一个函数
  return function() {
    return self.apply(t, args)
  }
}
以下为测试代码:
function fn1(a, b, c) {
  console.log('this', this)
  console.log(a, b, c)
  return 'this is fn1'
}
const fn2 = fn1.bind1({x: 100}, 10, 20, 30)
const res = fn2()
console.log(res)
手写 Promise 加载一张图片
function loadImg(src) {
  const p = new Promise(
    (resolve, reject) => {
      const img = document.createElement('img')
      img.onload = () => {
        resolve(img)
      }
      img.onerror = () => {
        const err = new Error('图片加载失败 ${src}')
        reject(err)
      }
      img.src = src
    }
  )
  return p
}

const url = 'http://xxxxxxxx'
loadImg(url).then(img => {
  console.log(img.width)
  return img
}).then(img => {
  console.log(img.height)
}).catch(ex => console.error(ex))
谈谈作用域和自由变量?
作用域分为:
- 全局作用域
- 函数作用域
- 块级作用域(ES6 新增)
自由变量:
- 一个变量在当前作用域没有定义,但被使用了
- 这时会向上级作用域一层一层一次寻找,直至找到为止
- 如果到全局作用域都没有找到,则报错
xx is not defined
聊聊闭包?
自由变量的查找,是在 函数定义 的地方,向上级作用域查找,不是在执行的地方。
作用域应用的特殊情况,有两种表现:
- 函数作为参数被传递
// 函数作为参数
function print(fn) {
  let a = 200;
  fn();
}
let a = 100;
function fn() {
  console.log(a)
}
print(fn) // 100,因为自由变量在函数定义的地方向上查找- 函数作为返回值被返回
// 函数作为返回值
function create() {
  let a = 100;
  return function() {
    console.log(a)
  }
}
let fn = create()
let a = 200
fn() // 100
聊一聊 this 的绑定规则?
this 的值是在 执行时 被确定的,不是在定义时候被确定的!!!它有以下绑定规则:
- 作为普通函数,返回 window
- 使用
call,apply,bind,传入什么绑定什么 - 作为对象方法被调用,this 指向当前实例本身
- 在箭头函数中,永远找它上级作用域中 this 的值
下面看几个 this 指向的例子:
// 实例一
const zhangsan = {
  name: '张三',
  sayHi() {
    // this 即当前对象
    console.log(this)
  },
  wait() {
    setTimeout(function() {
      // this === window
      console.log(this)
    })
  }
}
// 实例二
const zhangsan = {
name: '张三',
sayHi() {
// this 即当前对象
console.log(this)
},
waitAgain() {
setTimeout (() => {
// this 即当前对象
console.log(this)
})
}
}// 实例三
function fn1() {
console.log(this)
}
fn1() // window
fn1.call({x: 100}) // {x: 100}
const fn2 = fn1.bind({x: 200})
fn2() // {x: 200}正则表达式
常用的正则表达式 API:
- test
- search
- toString
// 2. 正则的 API: test,search,toString
var re = /\w\d{1,5}/;
console.log(re.test('_11111'));
console.log('aaa11111'.search(re));
console.log(re.toString());
js 异步
聊聊 Promise?
Promise 有三种状态:
- pending,resolved,rejected
- pending -> resolved 或 pending -> rejected
状态的表现
- pending 状态,不会触发 then 和 catch
- resolved 状态,会触发后续的 then 回调函数
- rejected 状态,会触发后续的 catch 回调函数
- then 正常返回 resolved,里面有报错则返回 rejected
- catch 正常返回 resolved,里面偶遇报错则返回 rejected
async/await 有什么区别?底层原理是什么?
它们解决了 callback hell 问题,是一个语法糖,promise,then,catch 是链式调用,但也是基于回调函数。它们和 Promise 的关系如下:
- 执行 async 函数,返回的是 Promise 对象;
- await 相当于 Promise 的 then;
- try...catch 可以捕获异常,代替了 Promise 的 catch
底层原理:用 Promise 控制 generator 函数的迭代器调用。
async/await、Promise 场景题
// catch 正常返回 resolved,里面有报错返回 rejected
const p3 = Promise.reject('my error').catch(err => {
  console.error(err)
})
console.log('p3', p3) // resolved !!!! 注意

const p4 = Promise.reject('my error').catch(err => {
  throw new Error('catch err')
})
console.log('p4', p4) // rejectedPromise.resolve().then(() => {
console.log(1) // 1. 1
}).catch(() => {
console.log(2)
}).then(() => {
console.log(3) // 2. 3
})Promise.resolve().then(() => {
console.log(1) // 1. 1
throw new Error('error1')
}).catch(() => {
console.log(2) // 2. 2
}).then(() => {
console.log(3) // 3. 3
})Promise.resolve().then(() => {
console.log(1) // 1. 1
throw new Error('error1')
}).catch(() => {
console.log(2) // 2. 2
}).catch(() => {
console.log(3)
})async function fn() {
return 100
}
(async function () {
const a = fn() // Promise,执行 async 返回一个 Promise
const b = await fn() // 100,await 相当于 Promise.then(100),故返回 100
})(async function () {
console.log('start') // 1. start
const a = await 100
console.log('a', a) // 2. a 100
const b = await Promise.resolve(200)
console.log('b', b) // 3. b 200
const c = await Promise.reject(300)
console.log('c', c) // 报错,后面的都不打印
console.log('end')
})async function async1() {
console.log('async start') // 2
await async2()
console.log('async1 end') // 6
}
async function async2 () {
console.log('async2') // 3
}
console.log('script start') // 1
setTimeout(function () {
console.log('setTimeout') // 8
}, 0)
async1()
new Promise (function (resolve) {
console.log('promise1') // 4
resolve()
}).then(function () {
console.log('promise2') // 7
})
console.log('script end') // 5什么是 Event Loop ?
事件循环(Event Loop)是异步回调的实现原理。回答这个问题要能够自己画出循环的关系图:

大致过程如下:
- 先执行同步代码,一行一行放在 call stack 中执行;
- 遇到异步代码,会先“记录”以下,等待时机;
- 时机一到,就会移动到 callback queue 里
- 如果 call stack 为空,即同步代码执行完, event loop 开始工作
- 轮询查找 callback queue,如果 call queue 不为空,则将事件移动到 call stack 中执行,如此往复。
宏任务和微任务有什么区别?
- 微任务执行要比宏任务执行要 早~~因为宏任务在 DOM 渲染后 触发,微任务在 DOM 渲染前 触发。
- 宏任务有:setTimeout,setInterval,Ajax,DOM
- 微任务有:Promise async/await
- 与事件循环不同的是,多了一个 micro task queue,在 call stack 清空之后,先执行 micro task queue 里的任务,然后 DOM 渲染,然后触发 Event Loop 执行宏任务。
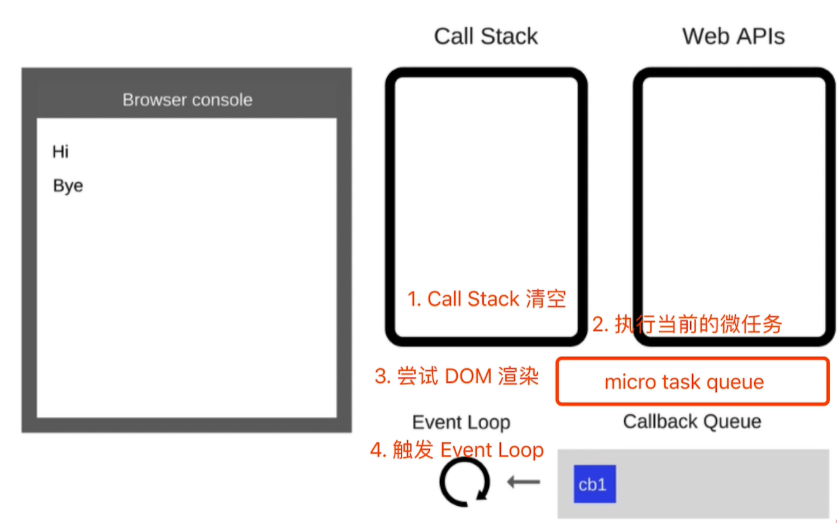
本质原因:
- 微任务是 ES6 语法规定的
- 宏任务是浏览器规定的
http 协议
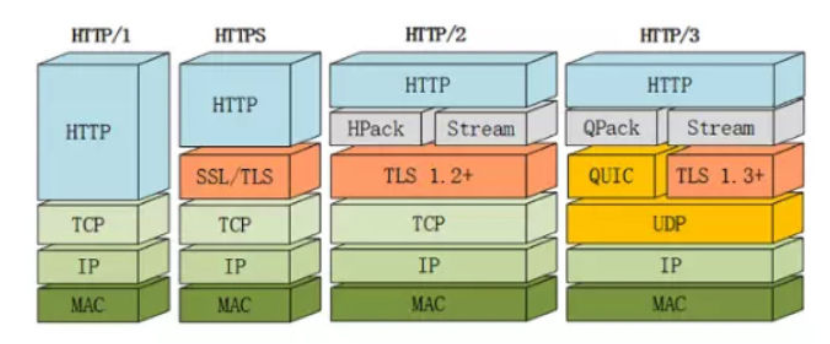
http1,http2, http3 的区别是什么?
http 常见的状态码?
- 1xx:服务器收到请求
- 2xx:请求成功
- 3xx:重定向
- 4xx:客户端错误
- 5xx:服务端错误
| 状态码 | 名称 | 含义 |
|---|---|---|
| 200 | OK | 请求成功,一般用于 GET 和 POST请求 |
| 301 | Moved Permanently | 永久重定向,请求的资源已被永久移动道新的 URI,返回信息会包括新的 URI,浏览器会自动顶向到新 URI |
| 302 | Found | 临时重定向 |
| 304 | Not Modified | 资源未被修改,服务器返回此状态码时,不会返回任何资源 |
| 400 | Bad Request | 请求错误,客户端请求的语法错误,服务器无法理解 |
| 401 | Unauthorized | 未授权,请求要求用户的身份认证 |
| 402 | Payment Required | 未花钱,非会员 |
| 403 | Forbidden | 服务器理解客户端的请求,但是拒绝执行此请求 |
| 404 | Not Found | 资源未找到,网站设计人员可以设置“您所请求的资源无法找到”的个性页面 |
| 500 | Internal Server Error | 服务器内部错误,无法完成请求 |
| 502 | Bad Gateway | 作为网关或者代理工作的服务器尝试执行请求时,从远程服务器接收到了一个无效的响应 |
| 503 | Service Unavailable | 由于超载或系统维护,服务器暂时无法处理客户端的请求 |
| 504 | Gateway Time-out | 网关超时:充当网关或代理的服务器,未及时从远端服务器获取请求 |
http 常见的 header 有哪些?
- 常见的 Request Headers
- 常见的 Response Headers
Request Headers
- Accept 浏览器可接收的数据格式
- Accept-Encoding 浏览器可接收的压缩算法,如 gzip
- Accept-Language 浏览器可接收的语言, 如 zh-CN
- Connection:keep-alive 一次 TCP 链接重复使用
- cookie
- host:请求的域名是什么
- User-Agent(UA)浏览器信息
- Content-type 发送数据的格式,如 application/json
Response Headers
- Content-type 返回数据的格式,如 application/json
- Content-length 返回数据的大小,多少字节
- Content-Encoding 返回数据的压缩算法,如 gzip
- Set-cookie:修改 cookie
缓存相关 的 headers
- Cache-Control: expires
- Last-Modified If-Modefied-Since
- Etag If-None-Match
http 缓存机制?
强缓存
Cache-Control 的值:
- max-age: 缓存最大过期时间
- no-cache:不适用强制缓存,正常想服务端发送请求
- no-store:不用本地的强制缓存,也不用服务端作缓存(不常用)
- private:只允许最终用户作缓存
- public:允许中间路由缓存
协商缓存(对比缓存)
- 服务端缓存策略
- 服务器判断客户端资源,是否和服务端资源一样
- 已知返回 304,否则返回 200 和最新资源
强缓存和协商缓存流程大致如下:

http 缓存优先级
资源标识有哪些?
在 Response Headers 中,有两种资源标识:
- Last-Modified:资源的最后修改时间
- Etag:资源的唯一标识
Last-Modified 和 Etag 的不同有:
- 会优先使用 Etag
- Last-Modefied 只能精确到秒级
- 如果资源被重复生成,而内容不变,则 Etag 更精确
GET/POST 区别?什么是 Restful API?
Restful API 是一种新的 API 架构,方便不用的前端设备和后端进行通信。传统的 API 设计是把每个 url 当坐一个功能,而 Restful API 把每个 url 当坐一个唯一的资源。
- 传统的 methods:
get获取数据,post修改数据 - 现在的 methods:
post新建数据,patch/put更新数据,delete删除数据
传统的 API 设计
- 不使用 url 参数:
/api/list?pageIndex=2 - post 请求:
/api/create-blog - post 请求:
/api/update-blog?id=100 - get 请求:
/api/get-blog?id=100
Restful API 设计
- 不使用 url 参数:
/api/list/2 - post 请求:
/api/blog - patch 请求:
/api/blog/100 - get 请求:
/api/blog/100
有哪些影响缓存策略的刷新操作?
- 正常操作:地址栏输入 url,跳转链接,前进后退等(强制缓存有效,协商缓存有效)
- 手动刷新:F5,点击刷新按钮,右击菜单刷新(强制缓存失效,协商缓存有效)
- 强制刷新:ctrl + F5(强制缓存失效,协商缓存失效)
http 建立连接的方式?
1. 长连接
在 HTTP/1.1 中,默认使用长连接,设置方式为在 HTTP Headers 中设置 Conenction: keep-alive。
长连接常用于操作频繁,点对点的通讯,并且连接不能太多的情况。
2. 短连接
在 HTTP/1.0 中,默认使用短连接。浏览器和服务器每进行一次 HTTP 操作,就建立一次连接,任务结束就断开连接。
并发量大,每个用户无需频繁操作的情况下使用短连接好。
JS-WEB-API
什么是防抖和节流?(性能优化)
- 防抖:用户输入结束或暂停时,才会触发 change 事件
- 节流:每个固定的时间段触发事件
聊一聊重绘与回流?
- 回流是指由于布局的改变需要重新生成渲染树的过程;重绘是指渲染树中的一些元素需要更新属性,这些更新只影响外观,比如
background color。 - 回流肯定意味着发生了重绘,但是重绘不一定触发回流。
js 如何发送一个 http 请求?
window.onload = function() {
  var url = "";
  var request = new XMLHttpRequest();
  request.onload = function() {
    if (request.status == 200) {
      displayContent(request.responseText)
    }
  };

  request.open("GET", url);
  request.send(null);
}

function displayContent(content) {
  var p = document.getElementById("content");
  p.innerHTML = content;
}
同源策略有哪些?如何解决跨域?
什么是跨域
不满足「同源策略」的请求方式可以认为是跨域。所有的跨域,
- ajax 请求时,浏览器要求当前网页和 server 必须同源,这样可保证安全;
- 同源:协议,域名,端口,三者必须一致。
哪些方式可以无视同源策略
<img />可用于统计打点,可使用第三方统计服务,站长统计<link /> <script>可使用 CDN,CDN 一般都是外域<script>可实现 JSONP
实现跨域的常见方式有 JSONP 和 CORS
JSONP
<script>可以绕过跨域限制- 服务器可以任意动态拼接数据返回
- 所以
<script>就可以获得跨域的数据,只要服务端愿意返回
<script>
window.callback = function(data) {
  // 这是我们得到的信息
  console.log(data)
}
</script>
<script src="https://imooc.con/getDate.js"></script>
<!-- 将返回 callback({x: 100, y: 200}) -->
JQuery 实现 jsonp
$.ajax({
  url: 'http://localhost:8882/x-origin.json',
  dataType: 'jsonp',
  jsonpCallback: 'callback',
  success: function (data) {
    console.log(data)
  }
})
CORS-服务器设置 http header
// 第二个参数直接填写允许跨域的域名称,不建议直接写 "*"
response.setHeader("Access-Control-Allow-origin", "http://localhost:8011");
response.setHeader("Access-Control-Allow-Headers", "X-Requested_With");
response.setHeader("Access-Control-Allow-Methods", "PUT, POST, GET, DELETE, OPTIONS");

// 接收跨域的 cookie
response.setHeader("Access-Control-Allow-Credentials", "http://localhost:8011");
Cookie,localStorage,sessionStorage 的区别是什么?
Cookie 的缺点
- 最大 4kb
- 增加请求数据量
- 只能用 document.cookie="xxx" 来修改,太过简陋
localStorage 和 sessionStorage
- HTML5 专门为存储而设计,最大可存 5M
- API 简单易用
localStorage.setItem()localStorage.getItem() - 不会随着 http 请求出去
不同点:
- localStorage 数据会永久存储,除非代码或手动删除
- sessionStorage 数据只存在当前会话,浏览器关闭则清空
- localStorage 会使用更多一些
使用场景
localStorage可以用来统计页面访问次数。适合长期保存在本地的数据。sessionStorage可以用来统计当前页面元素的点击次数。敏感账号的一次性登陆。cookie一般存储用户名密码相关信息,一般使用escape转义编码后存储。
cookie 和 session 的区别是什么?
| session | cookie |
|---|---|
| 在 服务器 端保存用户信息 | 在 客户端 保存用户信息 |
| session 中保存的是 Object 类型 | cookie 中保存的是 String 类型 |
| 随会话的结束而将其存储的数据 销毁 | cookie 可以 长期 保存在客户端 |
| 保存 重要 的信息 | 保存 不重要 的信息 |
主域名相同,子域名不同,如何跨域?
对于主域相同而子域不同的例子,可以通过设置document.domain的办法来解决。具体的做法是可以在 http://www.a.com/a.html 和 http://script.a.com/b.html 两个文件中分别加上 document.domain = ‘a.com’;然后通过 a.html 文件中创建一个 iframe,去控制 iframe 的 contentDocument,这样两个 js 文件之间就可以「交互」了。
DOMContentLoaded 和 load 的区别
当初始的 HTML 文档被完全加载和解析完成之后,DOMContentLoaded 事件被触发,而无需等待 样式表、图像和子框架 的完全加载。另一个不同的事件 load 应该仅用于检测一个完全加载的页面。
DOM 事件需要分几个级别?
- DOM0级事件:DOM0级事件处理程序的缺点在于一个处理程序无法同时绑定多个处理函数,比如我还想在按钮点击事件上加上另外一个函数。
- DOM2级事件:DOM2级事件在DOM0级事件的基础上弥补了一个处理程序无法同时绑定多个处理函数的缺点,允许给一个处理程序添加多个处理函数。
- DOM3级事件:在 DOM2级事件基础上添加了更多的事件类型:
- UI事件,当用户与页面上的元素交互时触发,如:load、scroll
- 焦点事件,当元素获得或失去焦点时触发,如:blur、focus
- 鼠标事件,当用户通过鼠标在页面执行操作时触发如:dbclick、mouseup
- 滚轮事件,当使用鼠标滚轮或类似设备时触发,如:mousewheel
- 文本事件,当在文档中输入文本时触发,如:textInput
- 键盘事件,当用户通过键盘在页面上执行操作时触发,如:keydown、keypress
- 合成事件,当为IME(输入法编辑器)输入字符时触发,如:ompositionstart
- 变动事件,当底层DOM结构发生变化时触发,如:DOMsubtreeModified
为什么没有DOM1级事件处理呢?因为1级DOM标准并没有定义事件相关的内容,所以没有所谓的1级DOM事件模型。
前端性能优化有哪些方式?
让加载更快:
- 减少资源体积:压缩代码
- 减少访问次数:合并代码,SSR 服务端渲染,缓存
- 使用更快的网络:CDN
让渲染更快:
- CSS 放在 head 里面,JS 放在 body 最下面
- 今早开始执行 JS,用 DOMContentLoaded 触发
- 懒加载,(图片懒加载,上滑查看更多)
- 对 DOM 查询进行缓存
- 频繁 DOM 操作,合并到一起插入 DOM 结构
- 节流 throttle 防抖 debounce
白屏时间?首屏时间?
https://blog.csdn.net/qq_41047322/article/details/82814396
- 白屏时间:白屏时间指的是浏览器开始显示内容的时间,我们一般认为浏览器开始渲染
<body>标签或者解析完<head>标签的时刻就是页面白屏结束的时间点 - 首屏时间:首屏时间是指用户看到的第一屏,就是网页顶部大小为当前窗口的区域显示完整的时间。
谈谈 CDN
CDN(Content Delivery Network)内容分发网络
- CDN 和电商系统的分布式仓储系统一样,分为 中心节点,区域节点,边缘节点,而数据缓存在离用户最近的位置。
- CDN 最擅长的是缓存静态数据,除此之外还可以缓存流媒体数据,这时要注意使用 时间戳防盗链。它也支持动态数据的缓存,一种是 边缘计算 的生鲜超市模式,另一种是 链路优化 的冷链运输模式。
最明显的应用就是我们在 APP Store 更新应用也不会喊卡了,因为苹果在国内部署了非常全面的 CDN。
webpack:publicpath 是什么?
publicpath 可以为所以项目的自愿指定一个基础路径,打包后的资源路径可以使用如下公式:
静态资源最终访问路径 = output.publicpath + 资源 loader 或插件等配置路径